
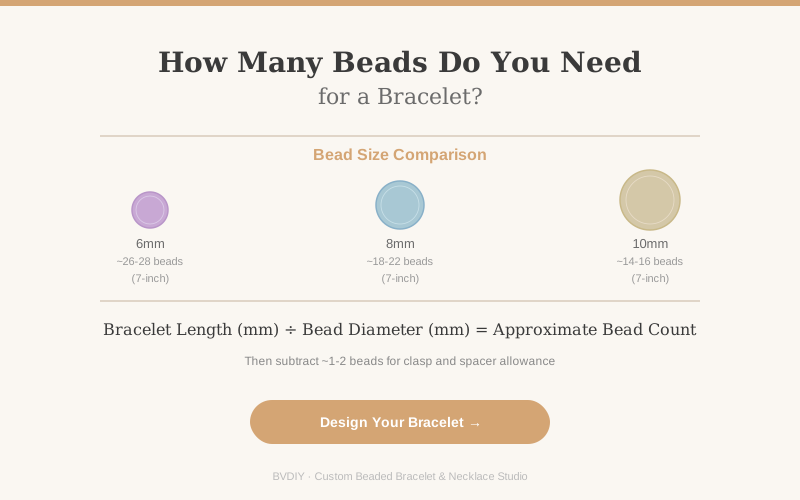
One of the first questions people ask when designing a custom bracelet is how many beads they actually need. The answer depends on three things: your wrist size, the bead diameter you choose, and how much spacing you want between beads. Getting the count right matters because a bracelet with too few beads feels loose and unfinished, while one with too many can feel tight or uncomfortable. This guide walks through the math and the design logic so you can plan your bead layout with confidence before you start building.
A 7-inch wrist needs about 23 beads at 8mm, 31 at 6mm, or 19 at 10mm for a stretch bracelet. These counts assume round beads strung edge to edge, no clasp or spacers, and a 1 cm (about 3/8 in) comfort allowance: (wrist + 1 cm) ÷ bead diameter, rounded to the nearest bead. If you add a clasp or spacers, subtract their length before dividing. The calculator below does the maths for any size.
Bead count calculator
Enter your wrist size and bead diameter to get a starting count for a stretch bracelet of round beads strung edge to edge, with no clasp or spacers.
How the calculator works
Bead count = (wrist circumference + comfort allowance) ÷ bead diameter, rounded to the nearest whole bead. Inches are converted at 25.4 mm per inch. Example: a 16 cm wrist with 1 cm allowance is a 170 mm strand; 170 ÷ 8 mm = 21.25, so 21 beads (168 mm). If you add spacer beads, a clasp or a larger focal bead, subtract their combined length from the strand before dividing, as explained in the sections below. Bead diameters vary slightly between batches, so check the fit on your wrist before tying off.
1. The basic formula: wrist size divided by bead size
The simplest way to estimate your bead count is to divide your wrist circumference by the bead diameter. Both measurements should be in the same unit — millimeters work best because bead sizes are given in millimeters.
For example, a 7-inch wrist is approximately 178mm. Add a 1 cm comfort allowance and the strand is about 188mm. With 8mm beads: 188 ÷ 8 = 23.5, so about 23 beads for a snug-comfortable stretch bracelet, or 24 if you like it a little looser. With a clasp, subtract the clasp length (10–15mm) first, which brings an 8mm bracelet down to about 22 beads; spacers reduce the main-bead count further.
Here is the quick reference for stretch bracelets (round beads edge to edge, no clasp or spacers, 1 cm comfort allowance, rounded to the nearest bead):
- 6mm beads: 6-inch wrist ≈ 27 beads, 7-inch wrist ≈ 31 beads, 8-inch wrist ≈ 36 beads
- 8mm beads: 6-inch wrist ≈ 20 beads, 7-inch wrist ≈ 23 beads, 8-inch wrist ≈ 27 beads
- 10mm beads: 6-inch wrist ≈ 16 beads, 7-inch wrist ≈ 19 beads, 8-inch wrist ≈ 21 beads
For a clasp or spacer beads, subtract their combined length from the strand before dividing. For a looser fit, use the 1.5 cm allowance or add one bead; for a snug fit, use 0.5 cm or remove one.
2. How bead size changes the look and count
Bead size affects not just the count but how the bracelet looks and feels on the wrist.
6mm beads create a delicate, refined look with smaller, closer-packed beads. They work well for multi-strand designs, bracelets with many accent colors, or people who prefer lightweight, understated jewelry. The smaller size means more individual beads, which gives you more opportunities to create patterns with multiple colors. A 7-inch bracelet with 6mm beads can comfortably accommodate four or five color transitions.
8mm beads are the most common choice for custom bracelets at BVDIY. They offer a balanced presence — visible enough to show color and finish clearly, but not so large that the bracelet feels bulky. At 8mm, each bead makes a statement without overpowering the design. The bead count stays manageable, which makes pattern planning easier. Most first-time designers start with 8mm beads for this reason.
10mm beads create a bold, substantial bracelet. The larger size reduces bead count significantly, which limits how many color transitions you can fit. A 10mm bracelet typically features one or two colors at most, with the focus on the bead finish itself rather than the pattern. These work well for single-material designs, such as all-pearl or all-crystal bracelets where the material quality is the main feature.
Browse the available bead sizes in the BVDIY bead library to see how different diameters look before you decide on your count.
3. Spacer beads and their impact on count
Metal spacer beads — small gold or silver beads placed between your main beads — affect bead count in two ways. First, each spacer takes up physical space on the bracelet, reducing the number of main beads needed. A 3mm spacer bead between every third main bead reduces the main bead count by roughly 10 to 15 percent compared to a spacer-free design.
Second, spacers change the visual rhythm of the bracelet. A design with spacers between every bead uses fewer main beads but creates a lighter, more breathable look. A design with spacers every fourth bead keeps most of the beads while adding a hint of metal shine. Both approaches are popular, and the choice depends on whether you want the bracelet to feel dense and beaded or light and layered.
A good rule of thumb: for every three main beads, add one spacer bead as a general rhythm. This keeps the bead count high enough for a full look while giving the eye natural resting points. Adjust the frequency based on whether you want more or less metal showing in the final design.
4. How the clasp affects bead count
The clasp takes up roughly 10mm to 15mm of the total bracelet length. This means approximately one bead's worth of space is consumed by the closure mechanism. When calculating bead count, subtract one bead's width from your total to account for the clasp.
A lobster clasp with an extension chain adds another variable — the extension chain gives the wearer 5mm to 10mm of adjustability, which can compensate for a slightly tight or loose bead count. If your design falls between two bead count options, choosing the higher count and using the extension chain to adjust is the safer approach. A bracelet that is slightly too large can be adjusted to fit. One that is too small cannot.
5. Pattern-based bead count planning
If your design uses a repeating pattern, the repeat length determines your total bead count. A pattern that repeats every 4 beads (for example: pearl, pearl, crystal, spacer) needs a total bead count that is divisible by 4 to end cleanly. If your wrist size calls for 22 beads but your pattern requires a multiple of 4, you would adjust to 20 or 24 beads and use the extension chain for final fit.
Here is how to plan pattern-based bead counts:
- Simple alternation (bead A, bead B, repeat): Total count must be even. Pair of 2.
- Three-bead pattern (A, B, C, repeat): Total count must be a multiple of 3.
- Four-bead pattern (A, B, C, spacer, repeat): Total count must be a multiple of 4.
- Asymmetric pattern (varying repeats with no fixed cycle): Add beads until the pattern's visual emphasis is balanced, then adjust total to fit the wrist.
Build and preview your pattern in the BVDIY bracelet designer to see how your layout looks at different bead counts before finalizing.
6. Estimating bead count for different bracelet types
Single-strand bracelet: The standard design. Use the basic formula above with 8mm beads as your starting point. A 7-inch stretch bracelet with 8mm beads uses about 23 beads; with a clasp and a few spacers, plan on roughly 18 to 20 main beads.
Multi-strand bracelet: Each strand needs its own bead count based on wrist size. Two stretch strands of 6mm beads on a 7-inch wrist use about 31 beads per strand, or about 62 in total. The smaller bead size helps keep multi-strand designs from feeling too heavy.
Adjustable bracelet with extension chain: Design for the smallest end of the adjustment range. If the bracelet adjusts from 6.5 to 8 inches, calculate the bead count for 6.5 inches. The extension chain handles the extra length. This ensures the bracelet fits at its tightest setting and can be loosened as needed.
Bracelet with a focal bead: A larger central bead (10mm or 12mm) surrounded by smaller beads (6mm or 8mm) needs a mixed calculation. Calculate the focal bead's space as its full diameter plus one adjacent spacer on each side. Then calculate the remaining length with the smaller bead diameter. A focal bead uses roughly 1.5 to 2 standard bead positions, so reduce your main bead count accordingly.
7. A practical example: designing an 8mm bracelet for a 7-inch wrist
Let us walk through a real example. Wrist size: 7 inches (178mm). Bead size: 8mm. Spacer frequency: one gold spacer every fourth bead. Clasp: lobster with 10mm extension chain.
Step 1: 178mm ÷ 8mm = 22.25. Round down to 22 beads for a starting point.
Step 2: Account for the clasp. Subtract one bead ≈ 14mm → approximately 20 main beads.
Step 3: Add spacers. At one spacer every fourth bead, 20 main beads use approximately 5 spacers. Each spacer takes 3mm, so total spacer length is roughly 15mm (about 2 bead positions). Adjust main bead count to approximately 18.
Step 4: Check the pattern. If you want a four-element pattern (bead, bead, bead, spacer), the bead group excluding the spacer is 3, and 18 divides evenly by 3: 18 main beads, 6 spacers and 1 clasp, for 24 elements in total. The extension chain provides 10mm of adjustment for a perfect fit.
This structured approach removes the guesswork. Once you know your wrist size and preferred bead diameter, you can calculate bead count for any design.
Related guides: How to Measure Your Wrist for a Bracelet and How to Choose Bead Size for a Custom Bracelet.