
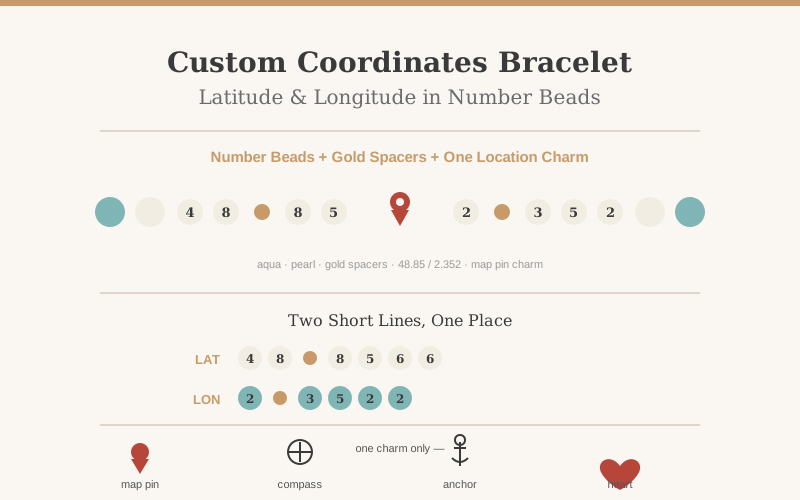
Places hold memories better than most gifts. A coordinates bracelet carries the latitude and longitude of one that matters — where you met, where you grew up, where you said yes — in number beads that read like a quiet secret. This guide shows how to turn a location into a bracelet that actually gets worn.
Pick one place and the moment behind it, trim its coordinates in decimal degrees to about four digits, and make number beads the focal point: one short line for latitude, one for longitude, separated by a gold spacer or a tiny charm. Add one location charm such as a map pin or compass, and let the bead colors echo the place: sea blues for a beach, earth tones for a hometown, or quiet city neutrals. You can build and preview the whole design in the bracelet designer, starting from the bead library.
1. Why a place is the most personal kind of message
Most personalized jewelry says a name. A coordinates bracelet says something rarer: a place — and the moment that happened there. Where you met. The town you grew up in. The spot where the proposal happened.
Anyone can read a name, but coordinates only mean something to those who know the story behind them. To everyone else it is a neat row of numbers; to you, it is the street, the season, the feeling of that afternoon. That is what makes it meaningful — a shared memory on their wrist, caught dozens of times a day.
2. Choose the place — and the moment behind it
Before you look up any numbers, choose the moment — coordinates are only as meaningful as the story attached to them. Pick the place that actually means something rather than the one that photographs best: where you met, a hometown, or a favorite holiday beach.
If the gift is for someone else — a parent, a best friend, a partner moving away — use a place you share with them: the neighborhood you grew up in, the city where your friendship started. A useful test: if you can tell the story in one sentence, the coordinates will carry it for years.
3. Format the coordinates so they fit a bracelet
Only one coordinate format translates neatly into beads: decimal degrees — the style that looks like 48.8566 for Paris or 34.0522 for Los Angeles. Trim each number to three or four digits after the decimal point. That is more precise than needed; a city reads clearly at that level, and shorter numbers make a cleaner design.
Drop the direction letters; the numbers alone are the design. If you want to include them, one letter bead or small arrow charm at the end of each line does the job. Arrange them as two short lines: latitude first, then longitude. If it still feels long, trim to three digits or keep the line that matters most — exactness to the street is not the point.
4. Turn the numbers into beads
Number beads are the heart of the design. Use a 6mm or 8mm set so the digits stay readable: group them in pairs — 48 85 66 — with a small spacer between groups, or space them evenly.
The decimal point is a lovely place for a detail: a tiny gold or silver spacer bead marks where it falls without shouting. Keep the two lines centered and symmetrical, framed by color beads on either side. The numbers are the focal point, so everything around them stays quieter.
5. Add one charm that says “place”
One charm does more than five. Choose a single symbol that fits the place: a map pin for a city, a compass for travel, an anchor for a coastal town, a mountain for the hike where things changed, a star for a night-sky memory, or a heart for where love started. Position it at the center, between the two lines, as the punctuation mark of the piece.
No obvious symbol? A tiny initial bead — the first letter of the city or their name — carries the same meaning.
6. Let the colors come from the place
The easiest palette for a bracelet is the place itself. A beach memory calls for aqua, pearl, and soft white; a mountain town for forest greens, wood, and slate; a city story for quiet neutrals with one gold accent. A hometown can borrow a school color. The bead library carries most shades in pearl, glass, crystal, and matte finishes, so matching a place usually takes just three or four tones.
7. Keep it wearable
A design also has to live on a wrist, not just on paper. Keep one focal point (the numbers), give them a spacer on each side, and choose smooth, durable beads with a secure clasp for everyday wear. For sizing, most women wear 6.5–7.5 inches (7 most common) and most men 7.5–8.5 inches (8 most common). When in doubt, size up slightly — a relaxed fit is more comfortable all day. The designer lets you set the length while you build.
Related guides: How to Design a Long-Distance Relationship Bracelet and Morse Code Bracelet Ideas.